To Enjoy Access, sign up at https://patreon.com/theloothgroup
To view this content, you must be a member of The Looth Group Patreon at $3 or more
Unlock with Patreon

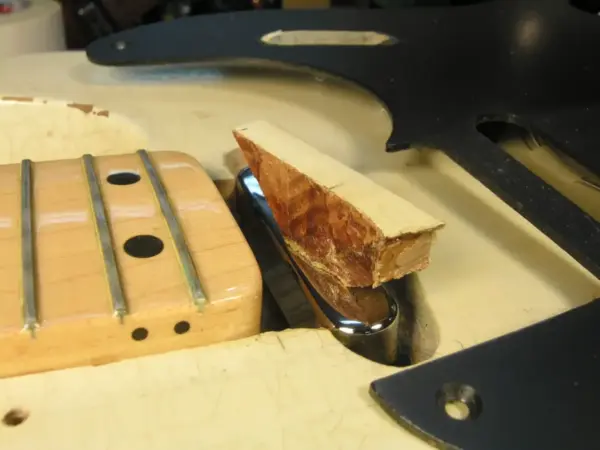
001) When I went took out the neck pickup to replace a piece of missing binding on the end of the fretboard, this is what I found.

002) I took detailed measurements of the cavity and made a cardboard template for tracing.

003) Then I started to level the wood evenly but decided it was too awkward to do it with chisels.

004) So, I clamped it to the solara board that a Special Guitarist made for me (Doug Proper) and clamped into the mill.

005) This way I could guarantee a perfect leveling of the torn up mahogany.

006) Next I took a piece of old Honduras and squared it on both sides.

007) I milled a 1/2” slot into the block the size of the original body rout . . .

008) . . . cut it to shape and then sawed 1/8” off.

009) It was a good fit, but would need some touching up on the edges.

010) My plan was to finish the piece as simply and fast as I could, starting with a coat or two of rattle-can blonde for a base coat (this is the first coat and sort of weak).

I forgot to take photos, but over the second coat of blond, I was about to mix up and color some Mohawk oil-base paste filler (which is messy and takes a lot of stirring since I don’t use it a lot). I also tried something new that worked pretty well. I shot a fairly weak coat of SM TV Yellow over the blond.

011) When the TV coat was dry for about an hour, I mixed Mixol ochre, red oxide, and “Maisgelb” yellow to match the somewhat “peanut butter” color of the Special’s filler . . .

012) . . . and used a bent guitar string to apply it.

013) I practiced on scrap first, then put my “faux filler” streaks directly onto the dry TV coat.

I still wasn’t taking photos, but I let the Mixol dry for an hour with a desk lamp warming it to speed up the drying time; then I sprayed one coat of Colortone Vintage Amber over that (hoping that it wouldn’t make the Mixol run, and it didn’t). When that had dried 30 minutes, I sprayed two coats of clear lacquer over it 30 minutes apart. I knew I was pushing my luck, but the desk lamp (60-watt incandescent) warming did the trick.

014) When all the coats had dried (this is still the same day) I used fish glue to glue it into the pocket with 1/4” acrylic caul keeping it flat (and wax paper under that of course). I also added a block of maple for gentle but firm pressure.

015) While experimenting earlier, I tried mixing superglue with Colortone water-base grain filler thinking it might make an good wood filler; what I found was that, like mixing superglue into baking soda, it hardened instantly and I’d never be able to apply it before it kicked (Also, it hardened like a rock! I plan to experiment more with it for other possible uses). What I did use it for was brushing dry filler into the seams around the edges of the glued-in fill, packing it down into the crevices, and then carefully brushing and vacuuming the unwanted powder away.

016) Then I mixed white, amber, and a touch of brown super glue into a color matching the finish . . .

017) Then I was done — though not perfect by “Ding King” standards, I was very pleased with the result, and happy that it was done so fast. This repair was done in two days, and the actual time I spent was 7 hours which I think is pretty fast.

017) Then I was done — though not perfect by “Ding King” standards, I was very pleased with the result, and happy that it was done so fast. This repair was done in two days, and the actual time I spent was 7 hours which I think is pretty fast.

Responses

Related Articles